.png)
LogDrop iOS SDK
The LogDrop iOS SDK is written in Swift and can be integrated into your project using either CocoaPods or Swift Package Manager (SPM).
1. SDK Installation
1.1. Install via CocoaPods
target 'YourAppTarget' do
  pod 'LogDrop'
endpod install1.2. Install via Swift Package Manager (SPM)
- Open your project in Xcode. 2. Go to File → Add Packages... 3. Enter the following URL:
https://github.com/initialcodess/LogDrop-iOS- Select Up to Next Major Version. 5. Add the LogDrop package to your app target.
2. Initialization
Call the following during app startup (for example in AppDelegate or your main app entry point):
let config = LogDropConfig.Builder()
    .setAppId("YOUR_APP_ID")
    .setLoggingEnabled(true)
    .setBaseUrl("YOUR_BASE_URL") // Optional: for self-hosted LogDrop
    .build()

LogDrop.initialize(with: config)
3. Deep Links
If your app owns deep link routing, forward incoming links to LogDrop manually after the URL reaches your app layer.
3.1. Custom Scheme Deep Links
func application(
    _ app: UIApplication,
    open url: URL,
    options: [UIApplication.OpenURLOptionsKey : Any] = [:]
) -> Bool {
    LogDrop.handleIncomingURL(url)
    return true
}
3.2. Universal Links
func application(
    _ application: UIApplication,
    continue userActivity: NSUserActivity,
    restorationHandler: @escaping ([UIUserActivityRestoring]?) -> Void
) -> Bool {
    LogDrop.handleUserActivity(userActivity)
    return true
}
3.3. SwiftUI App Lifecycle
.onOpenURL { url in
    LogDrop.handleIncomingURL(url)
}
.onContinueUserActivity(NSUserActivityTypeBrowsingWeb) { userActivity in
    LogDrop.handleUserActivity(userActivity)
}
Use LogDrop.handleIncomingURL(_:) for custom-scheme links and LogDrop.handleUserActivity(_:) for universal links.
4. LogDropConfig Overview
-
appId: StringYour LogDrop project Application ID. Required. -
isLoggingEnabled: BoolEnables or disables SDK logging. Useful in development for debugging. -
baseUrl: String?Custom backend URL for on-prem / self-hosted LogDrop deployments. -
pushAppGroupSuiteName: String?App Group shared by the main application and Notification Service Extension. -
pushCallbacks: LogDropPushCallbacks?Receives notification received, opened, and silent-push callbacks. -
pushDeeplinkHandler: LogDropPushDeeplinkHandler?Lets the application take over routing for push actions and deep links. -
inAppLifecycleCallbacks: LogDropInAppLifecycleCallbacks?Observes in-app popup presentation and dismissal. -
internalBrowserLifecycleCallbacks: LogDropInternalBrowserLifecycleCallbacks?Observes LogDrop's internal browser lifecycle.Use the builder to construct the configuration in a safe and fluent way.
5. Crash Tracking (dSYM Upload)
To symbolicate crash reports, dSYM files must be uploaded to LogDrop.
5.1. Add a Run Script Phase
-
Select your app Target in Xcode. 2. Open the Build Phases tab. 3. Click
+and choose New Run Script Phase. 4. Move the Run Script to the bottom of the Build Phases list.Script:
export LOGDROP_BASE_URL="<YOUR_BASE_URL>"
export LOGDROP_API_KEY="<YOUR_API_KEY>"

SCRIPT=$(find "${BUILD_DIR%/Build/*}/SourcePackages/checkouts/LogDrop-iOS" -name "upload_dsym.sh" | head -n 1)
/bin/sh "$SCRIPT"-
LOGDROP_BASE_URL– Optional. If not set, the default production backend is used. -
LOGDROP_API_KEY– API key of the LogDrop project that will receive crash reports.5.2. Input Files
In the same Run Script phase, add the following entries under Input Files (one per line):
${DWARF_DSYM_FOLDER_PATH}/${DWARF_DSYM_FILE_NAME}
${DWARF_DSYM_FOLDER_PATH}/${DWARF_DSYM_FILE_NAME}/Contents/Resources/DWARF/${PRODUCT_NAME}
${DWARF_DSYM_FOLDER_PATH}/${DWARF_DSYM_FILE_NAME}/Contents/Info.plist
$(TARGET_BUILD_DIR)/$(EXECUTABLE_PATH)
5.3. Enable Crash Tracking in the Config
Crash tracking is resolved and controlled dynamically from the LogDrop backend (Settings -> Remote Config) rather than locally in the config builder.
If dSYM files are missing or outdated, you can also upload them manually from the LogDrop panel.
6. Logging Methods
LogDrop.e("Payment failed", logFlow: flow)   // Error
LogDrop.w("Slow network", logFlow: flow)     // Warning
LogDrop.i("User logged in", logFlow: flow)   // Info
LogDrop.d("Parsing response", logFlow: flow) // DebugLogDrop.sendLogs()- Schedules a background job that runs approximately 60 seconds later.
- If a job is already scheduled or running, additional calls do not create new jobs.
7. LogFlow
LogFlow lets you group related logs under a specific business flow or transaction.
let flow = LogFlow(
    name: "SuccessTransaction",
    id: transactionId,
    customAttributes: [
        "amount": "149.90",
        "currency": "TRY"
    ]
)

LogDrop.i("Transaction completed successfully.", logFlow: flow)
In the LogDrop panel you can filter and analyze logs by flowName and flowId.
8. Push Notification Integration (APNs)
LogDrop supports alert, rich, in-app, deep-link, internal-browser, and silent fetch-logs pushes through APNs.
8.1. Permission and APNs Token
Request permission through LogDrop. When permission is granted, the SDK also registers the application for remote notifications.
LogDrop.requestPushNotificationAuthorization()Forward the APNs device token from AppDelegate:
func application(_ application: UIApplication,
                 didRegisterForRemoteNotificationsWithDeviceToken deviceToken: Data) {
    LogDrop.onNewApnsToken(apnsToken: deviceToken)
}
8.2. Remote Notification Handling
Forward remote notification payloads delivered to the application. LogDrop distinguishes its own push payloads from silent fetch-logs commands internally.
func application(_ application: UIApplication,
                 didReceiveRemoteNotification userInfo: [AnyHashable: Any],
                 fetchCompletionHandler completionHandler: @escaping (UIBackgroundFetchResult) -> Void) {
    LogDrop.onRemoteMessageReceived(userInfo)
    completionHandler(.noData)
}
8.3. Notification Service Extension and App Group
A Notification Service Extension allows LogDrop to process and record an alert push even when the application is not running. The application and extension share the required state through an App Group.
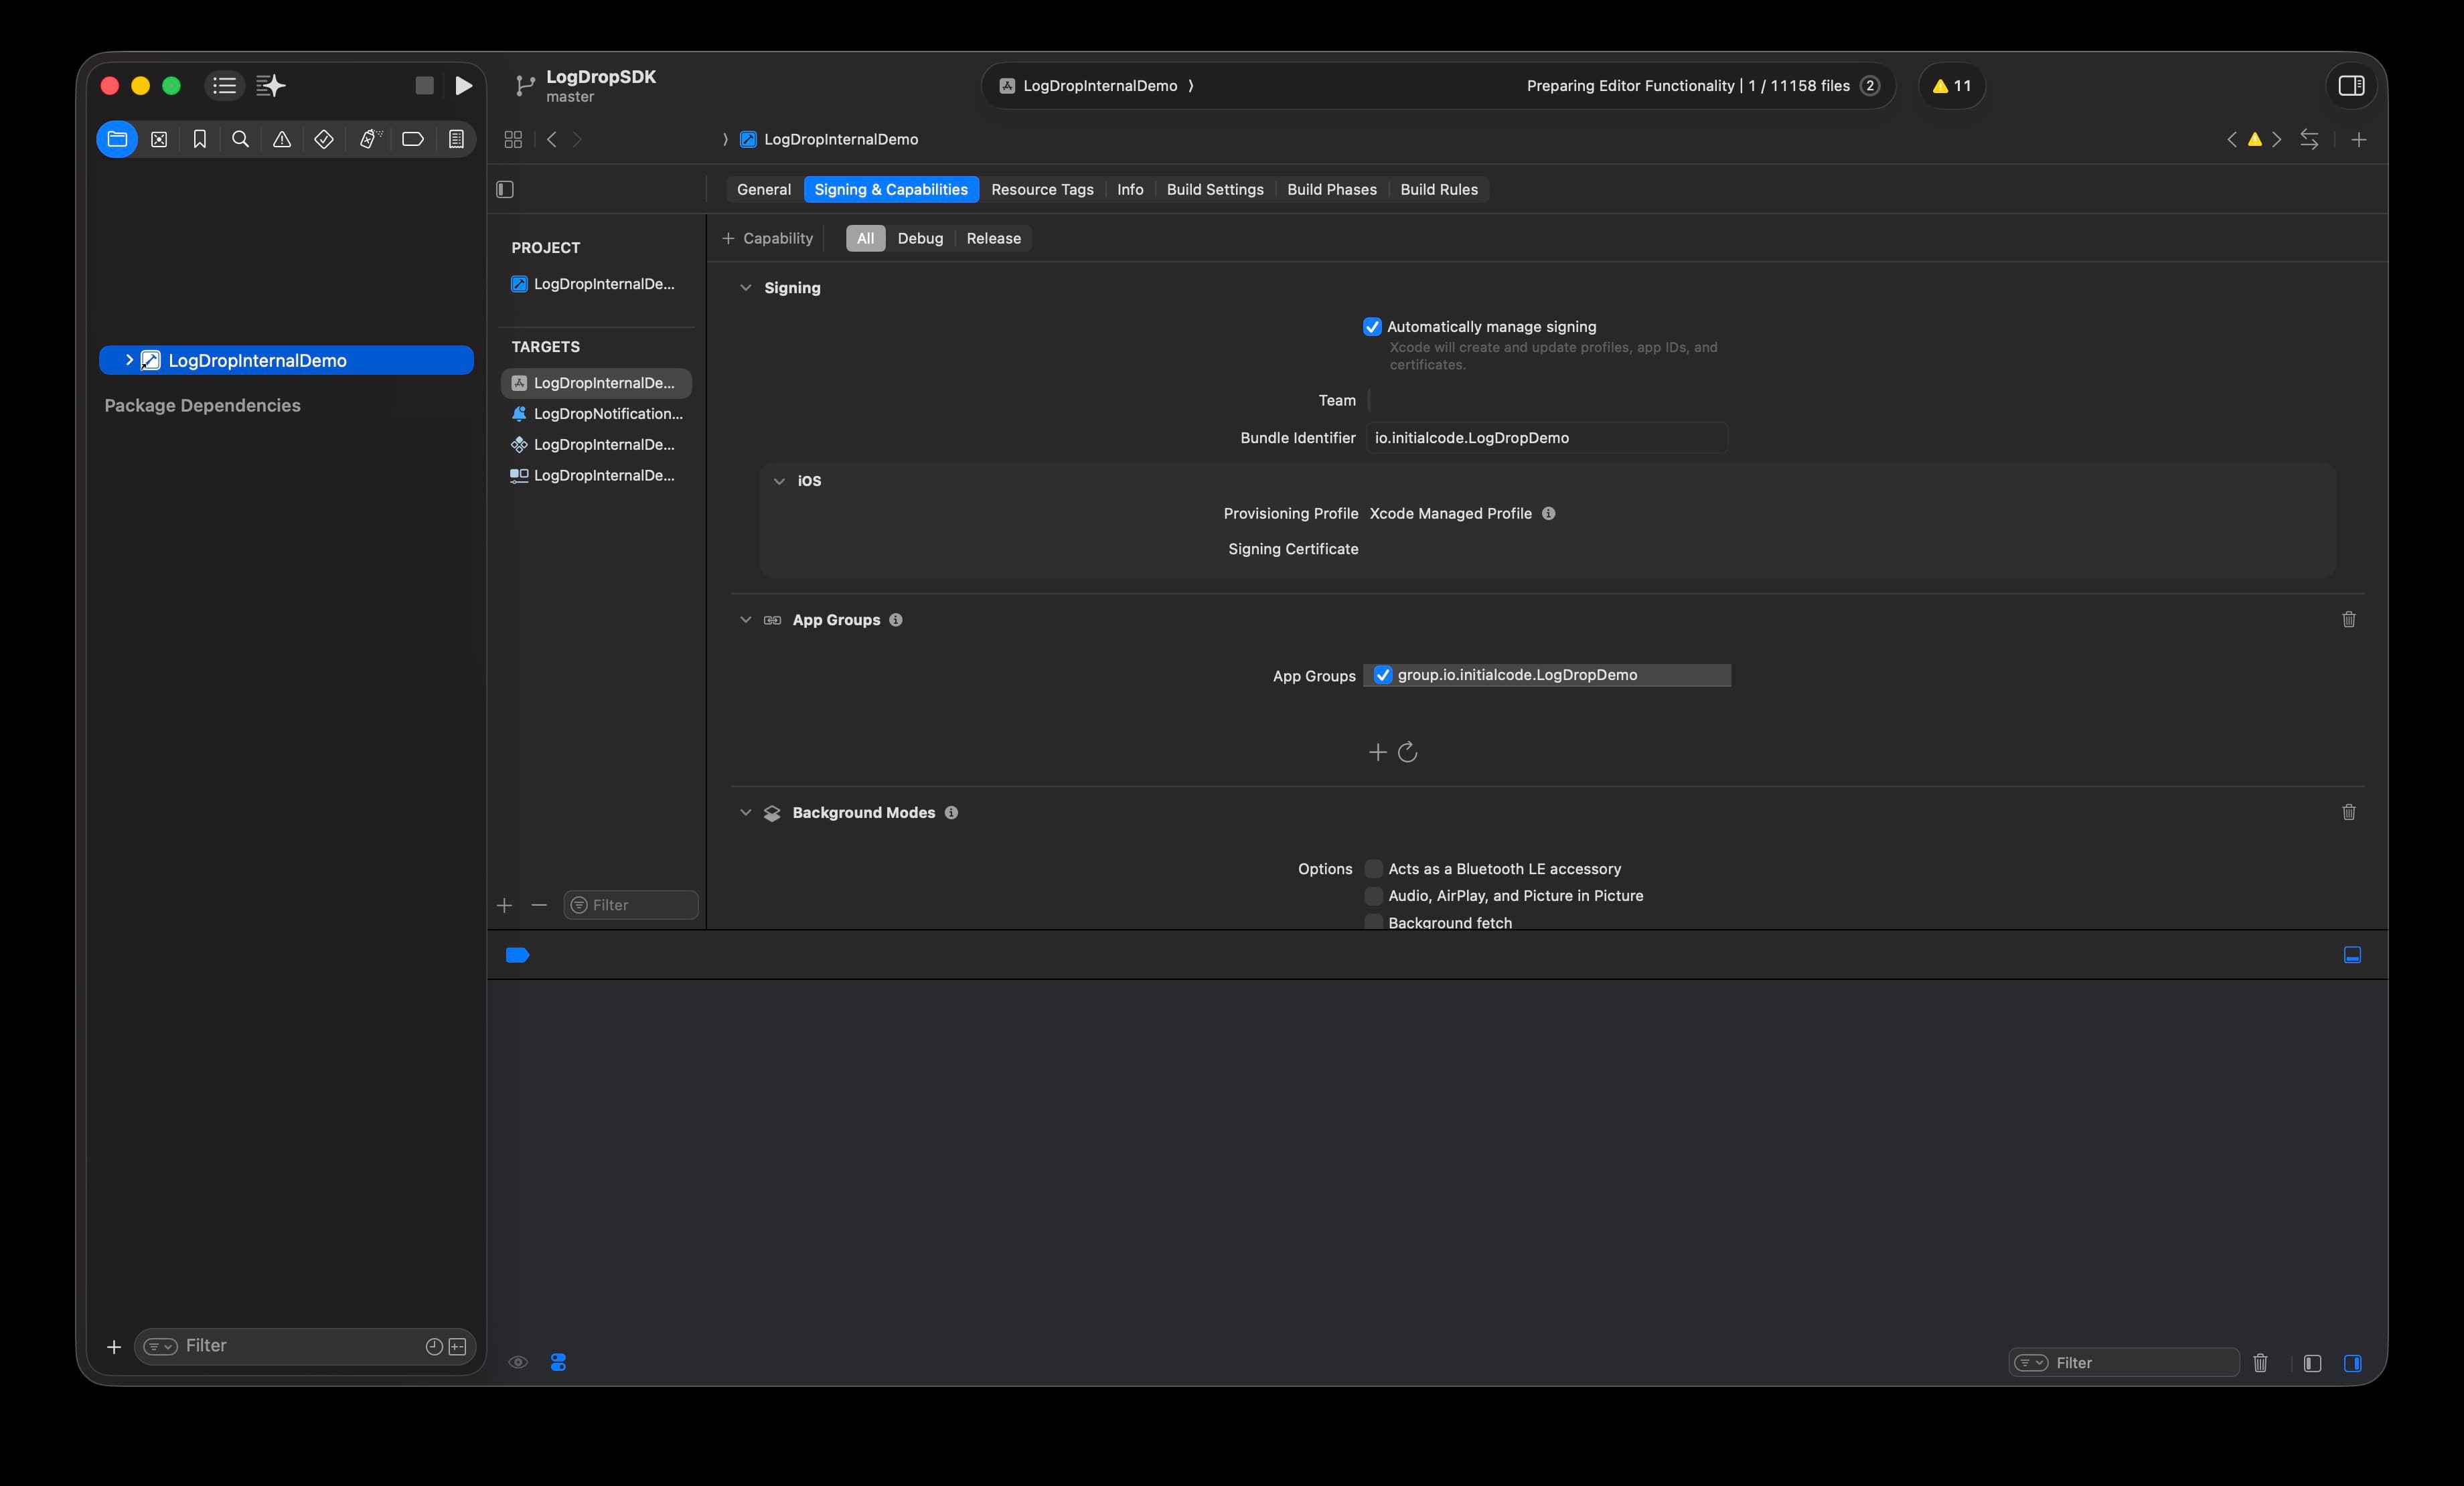
8.3.1. Add the App Groups Capability
The App Group identifier is important because LogDrop uses it to share
UserDefaults data between the application and the Notification Service Extension.
- Select your app target in Xcode.
- Open Signing & Capabilities and click + Capability.
- Add App Groups, then create a group identifier or select an existing one.
Pass the selected identifier to the main application configuration:
let config = LogDropConfig.Builder()
    .setAppId("YOUR_APP_ID")
    .setBaseUrl("YOUR_BASE_URL") // Optional: for self-hosted LogDrop
    .setPushAppGroupSuiteName("group.com.yourcompany.yourapp")
    .build()

LogDrop.initialize(with: config)
8.3.2. Add a Notification Service Extension
- In Xcode, select File → New → Target..., then choose Notification Service Extension.
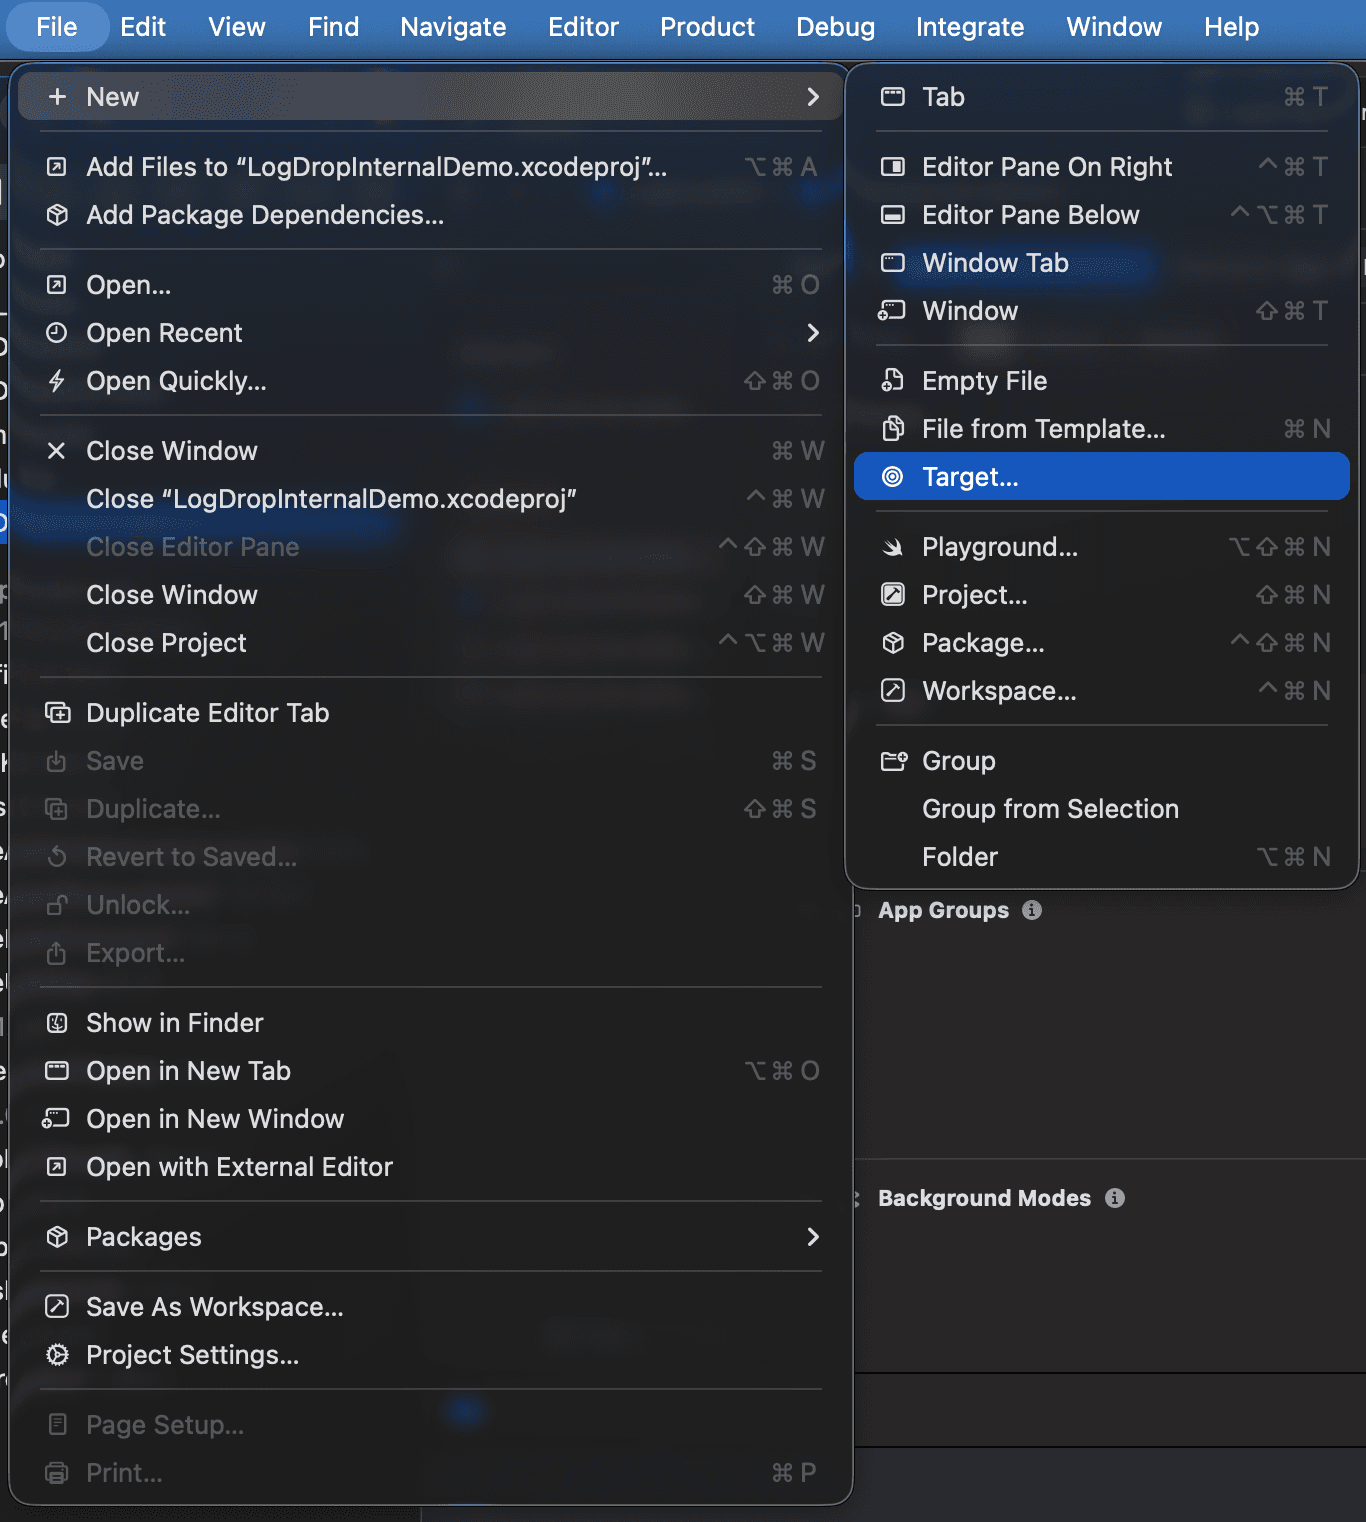
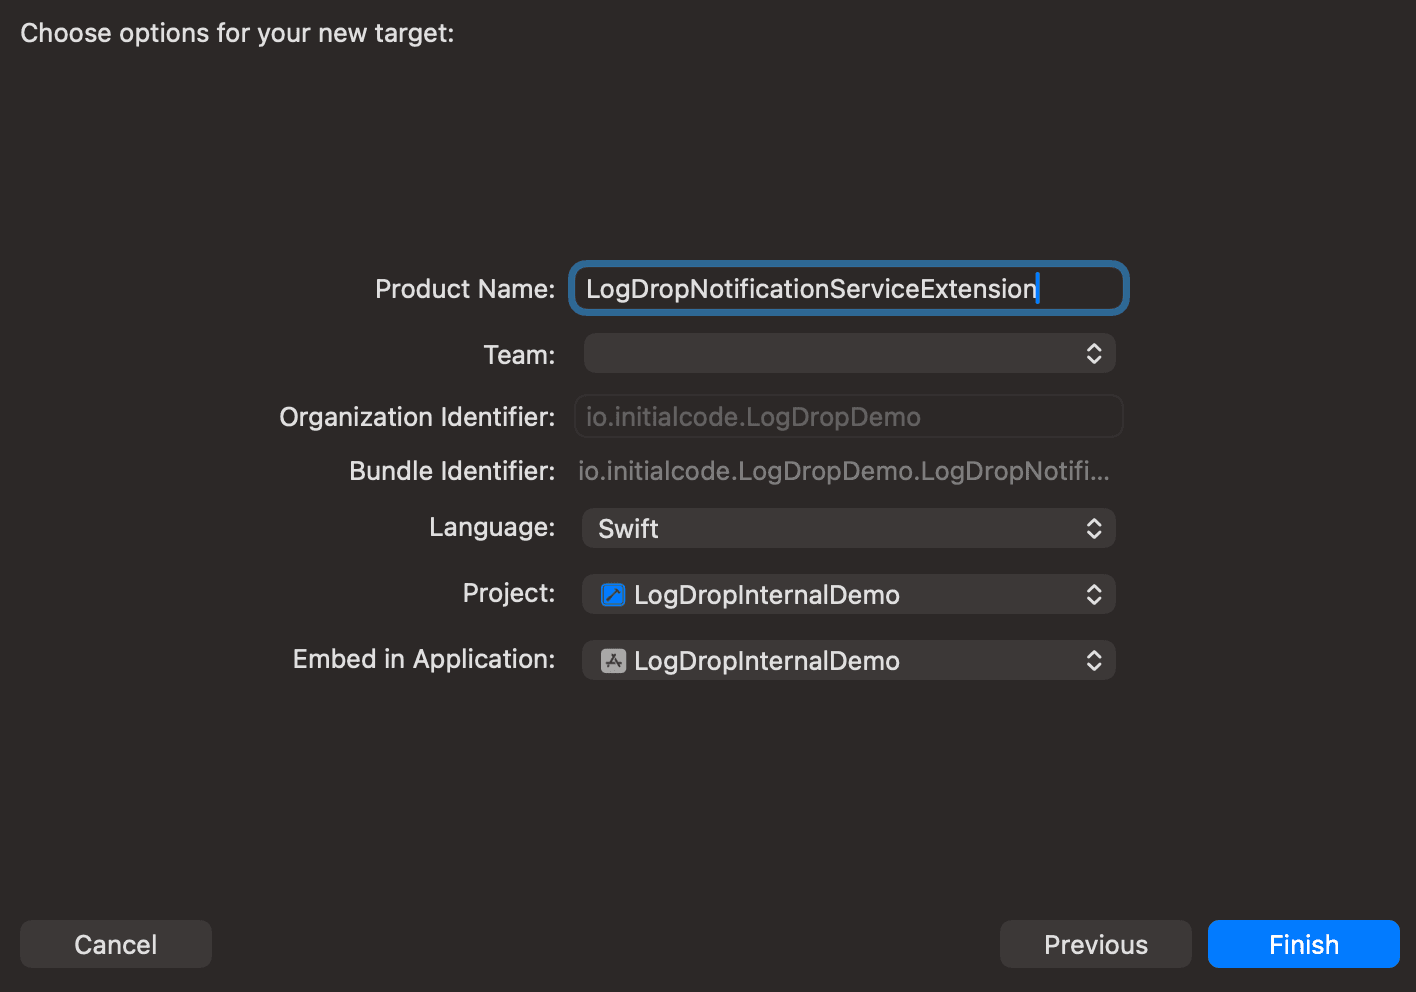
- Enter a product name, select your project, choose the application under Embed in Application, and click Finish.
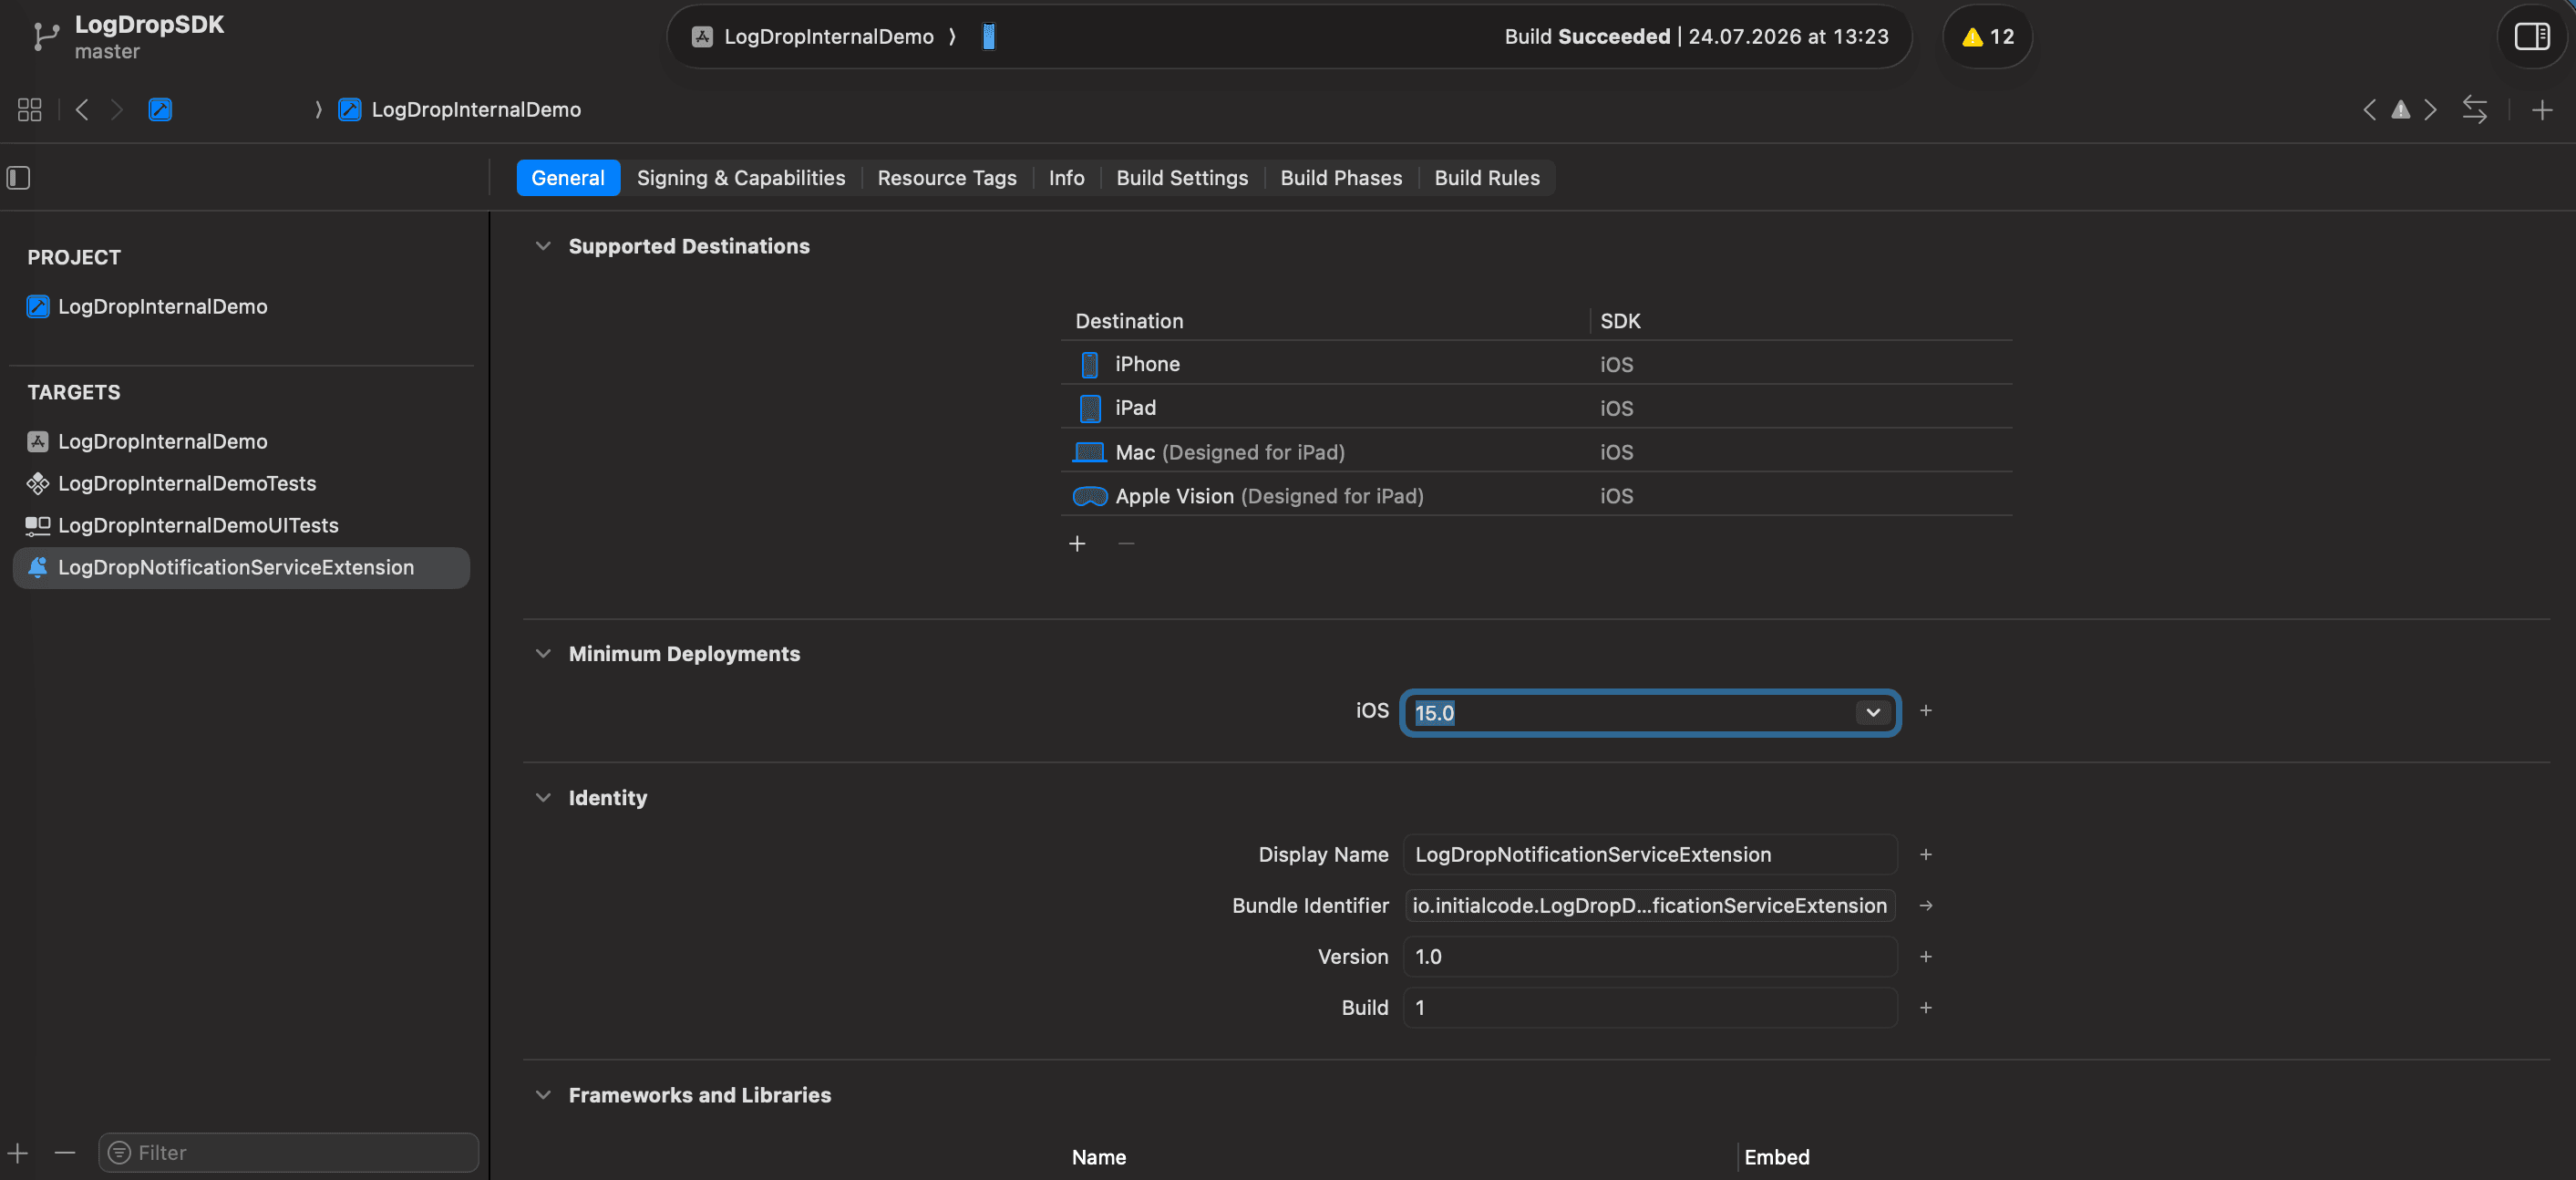
- Select the newly created extension target and set its Minimum Deployments iOS version to the same value as the app target.
- Make sure
LogDropSDKis linked to the extension target under General → Frameworks and Libraries. If you use CocoaPods, also addpod 'LogDrop'to the extension target in yourPodfileand runpod install. - Open the extension target's Signing & Capabilities tab, add App Groups, and select the same group identifier used by the app target.
- Replace the generated
NotificationService.swiftimplementation with:
import LogDropSDK

final class NotificationService: LogDropNotificationServiceExtension {
    override func logDropConfiguration() -> LogDropConfig? {
        LogDropConfig.Builder()
            .setAppId("YOUR_APP_ID")
            .setBaseUrl("YOUR_BASE_URL") // Optional: for self-hosted LogDrop
            .setPushAppGroupSuiteName("group.com.yourcompany.yourapp")
            .build()
    }
}
Use the same App Group identifier in the app target, extension target, main application configuration, and extension configuration.
8.4. Show a Pending In-App Push
When the application's UI is ready, ask LogDrop to show any queued in-app popup or internal-browser action:
LogDrop.showPendingPushPopup()The method returns LogDropPopupShowResult, which can be used if the application
needs to react to whether an item was shown, unavailable, or not pending.
9. User Identification (UUID Customization)
By default, logs are tied to a device identifier. To associate logs with your own user ID:
LogDrop.updateUser(userUuid: "user-1234@example.com")-
Email address
-
Internal customer ID
-
Other application-specific user ID
All subsequent logs will be associated with this user in the LogDrop panel.
10. Custom Events
Use custom events to track application-specific actions that are not covered by LogDrop's built-in events. Send a stable event name together with optional JSON-compatible properties.
10.1. Track a Custom Event
LogDrop.trackCustomEvent(
    eventName: "purchase_completed",
    properties: [
        "coupon_code": "SUMMER10",
        "amount": 49.9,
        "item_count": 2,
        "is_first_order": true
    ]
)
Properties are optional. To track an event without properties:
LogDrop.trackCustomEvent(eventName: "onboarding_completed")Provide only the readable event name and properties. Event and property codes shown in the panel are managed by LogDrop.
10.2. Supported Property Values
Custom properties may contain strings, numbers, booleans, Date values, NSNull,
nested dictionaries, and arrays. Dictionary keys must be strings.
LogDrop.trackCustomEvent(
    eventName: "product_viewed",
    properties: [
        "sku": "LD-100",
        "viewed_at": Date(),
        "product": [
            "name": "LogDrop Hoodie",
            "price": 79.95
        ],
        "categories": ["merch", "hoodies"],
        "variants": [
            ["color": "black", "size": "M"],
            ["color": "green", "size": "L"]
        ],
        "campaign": NSNull()
    ]
)
Date values are represented as ISO-8601 strings in LogDrop. Nested dictionaries
and arrays remain structured values.
10.3. Naming and Property Types
- Use stable and consistent names. For example, do not alternate between
purchase_completedandpurchaseCompletedfor the same event. - Do not put IDs, timestamps, or other dynamic values in the event name. Add them as properties instead.
- Do not use the name of a LogDrop default event for a custom event.
- Keep each property's type stable. For example, always send
amountas a number rather than sometimes sending a number and sometimes a string. - Reusing the same event name updates the same custom event schema. Changing the name creates a different custom event.
If a property is later sent with a different type, LogDrop keeps the event but marks the property as a type conflict in the panel. Type conflict tracking helps find integration mistakes; it should not be used as a replacement for a stable event contract.
10.4. Limits and Validation
- Event names can contain up to 128 characters.
- Property names can contain up to 128 characters.
- One event can contain up to 100 top-level properties.
- The complete properties JSON can contain up to 16 KB in UTF-8, including property names, primitive values, nested objects, and arrays.
- Event names and property names cannot be empty.
- Property values must be JSON-compatible.
If validation fails, the SDK rejects the complete event and writes the reason to the SDK log. Names, properties, and payloads are never silently truncated.
10.5. Panel Behavior
No custom event definition is required before tracking. After the first valid event reaches LogDrop, the Events page shows the event, its generated code, observed properties, property types, and any type conflicts. You can then use the event in event details and Event Analytics funnels.
11. Custom User Attributes
Custom user attributes let you attach stable profile information to the current
LogDrop device and use it for segment-based push targeting in the panel. Call the
API after LogDrop.initialize(with:) has completed.
11.1. Set or Update Attributes
LogDrop.setCustomAttributes([
    "plan_type": "premium",
    "country": "TR",
    "preferred_language": "tr"
])
New attributes are merged with the values already stored by the SDK. Sending an existing key replaces its value; other keys remain unchanged. Valid changes are persisted locally and synchronized with LogDrop automatically.
11.2. Remove an Attribute
LogDrop.removeCustomAttribute(key: "plan_type")Removing a key also synchronizes the deletion with LogDrop, so the old value is no longer available for future segment targeting.
11.3. Limits and Validation
- A device can have up to 30 custom attributes in total.
- Keys must contain only letters, numbers, underscores (
_), or hyphens (-). - Keys can contain up to 64 characters.
- Values must be non-blank strings containing up to 256 characters.
- If one entry in a call is invalid, the SDK rejects the complete update.
- If the merged result would exceed 30 keys, the SDK keeps the previous attribute set unchanged.
Custom user attributes are different from LogFlow.customAttributes. User attributes
describe a device for audience targeting, while flow attributes add context only to the
logs recorded with that LogFlow.
11.4. Use Attributes in the Panel
After the device synchronizes, open Push Notification → Send Push, select Segment under Recipients, and build a filter with the attribute key. See Segment Targeting with Custom Attributes.
12. Troubleshooting
- Verify that
LOGDROP_API_KEY(orLOGDROP_APP_ID) andLOGDROP_BASE_URLare correctly set. - Make sure the dSYM upload Run Script is at the bottom of the Build Phases list.
- Check the Xcode build log for any errors from
upload_dsym.sh. - Confirm that custom event names do not match LogDrop default event names.
- Check SDK logs when a custom event is missing; invalid names, properties, or oversized payloads are rejected locally.
- Check SDK behavior when custom user attributes are missing; invalid updates and updates exceeding 30 keys are rejected locally.
- In development, enable verbose SDK logging with:
.setLoggingEnabled(true)