.png)
Send Push
Send Standard push, In-App Messages, and Deeplinks to your users
The Send Push interface lets you compose, preview, and dispatch various types of notifications and messages to your application users. It provides a step-by-step configuration flow and a real-time live preview panel.
Step-by-Step Configuration
1) Message Mode
Select the type of message you wish to send:
- Standard – A standard push notification appearing on the user's system tray.
- In-App Message – An interactive rich modal or banner displayed inside the app.
- Deeplink – A navigation-triggering URL that opens a specific app screen or fallback website.
- Alert vs Silent – Toggle whether the push triggers a visible/audible system alert (
Alert) or transmits a background data payload (Silent).
2) Platform
Choose the target operating systems for your push broadcast:
- iOS – Dispatched via Apple Push Notification service (APNs).
- Android – Dispatched via Firebase Cloud Messaging (FCM).
- Huawei – Dispatched via Huawei Push Kit.
3) Recipients
Define your target audience segment:
- All Users – Broadcasts to all registered application installations.
- Segment – Targets registered devices by custom user attributes synchronized from the SDK.
- Single – Targets a single user UUID or push token.
- Multiple – Targets a comma-separated list of user UUIDs or tokens.
Segment Targeting with Custom Attributes
Before creating a segment, set custom user attributes through the SDK used by your app and let the device synchronize them with LogDrop:
Android
LogDrop.setCustomAttributes(
    mapOf(
        "plan_type" to "premium",
        "country" to "TR"
    )
)
iOS
LogDrop.setCustomAttributes([
    "plan_type": "premium",
    "country": "TR"
])
Flutter
await LogDrop.setCustomAttributes({
  'plan_type': 'premium',
  'country': 'TR',
});
React Native
LogDrop.setCustomAttributes({
  plan_type: 'premium',
  country: 'TR',
});
Then configure the audience in Push Notification → Send Push:
- Select the platforms that should receive the message.
- Under Recipients, select Segment.
- Click Add Filter and select a synchronized attribute key.
- Choose an operator and enter its value when required.
- Add more filters if needed, then choose All match (AND) or Any match (OR).
- Review the message and click Send Now.
The segment operators are:
- Equals – The attribute equals the entered value.
- Not Equals – The attribute does not equal the entered value.
- In – The attribute equals one of the comma-separated values.
- Exists – The attribute key is present; no value is required.
For example, plan_type Equals premium AND country In TR, DE targets
premium devices whose country is either Turkey or Germany.
The Attribute list is populated from keys already synchronized by devices in the current project. Use the same stable key names across platforms. Setup details are available in Android Custom User Attributes, iOS Custom User Attributes, Flutter Custom User Attributes, and React Native Custom User Attributes.
A segment requires at least one valid filter and supports up to 20 filters. Attribute keys can contain only letters, numbers, underscores, or hyphens and are limited to 64 characters. Filter values are limited to 256 characters.
Message-Specific Configurations
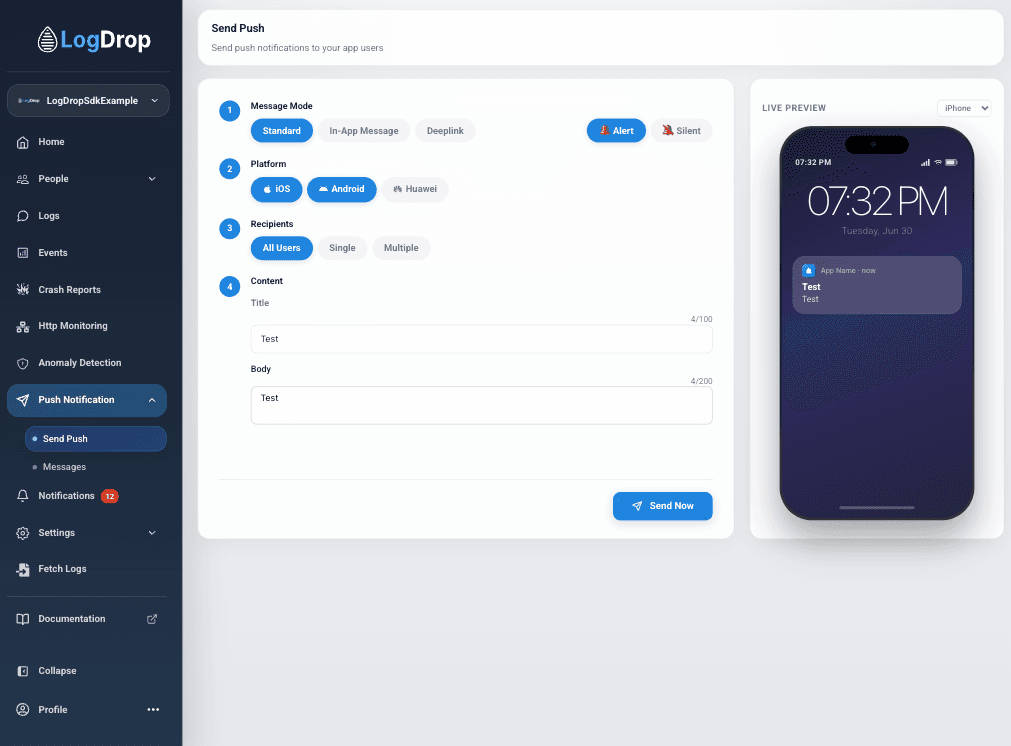
Message Mode: Standard
A simple alert layout that appears on the user's lock screen or notification center.
- Title – Main heading of the notification (max 100 chars).
- Body – Explanatory body text of the message (max 200 chars).
Screenshot: Standard push configuration
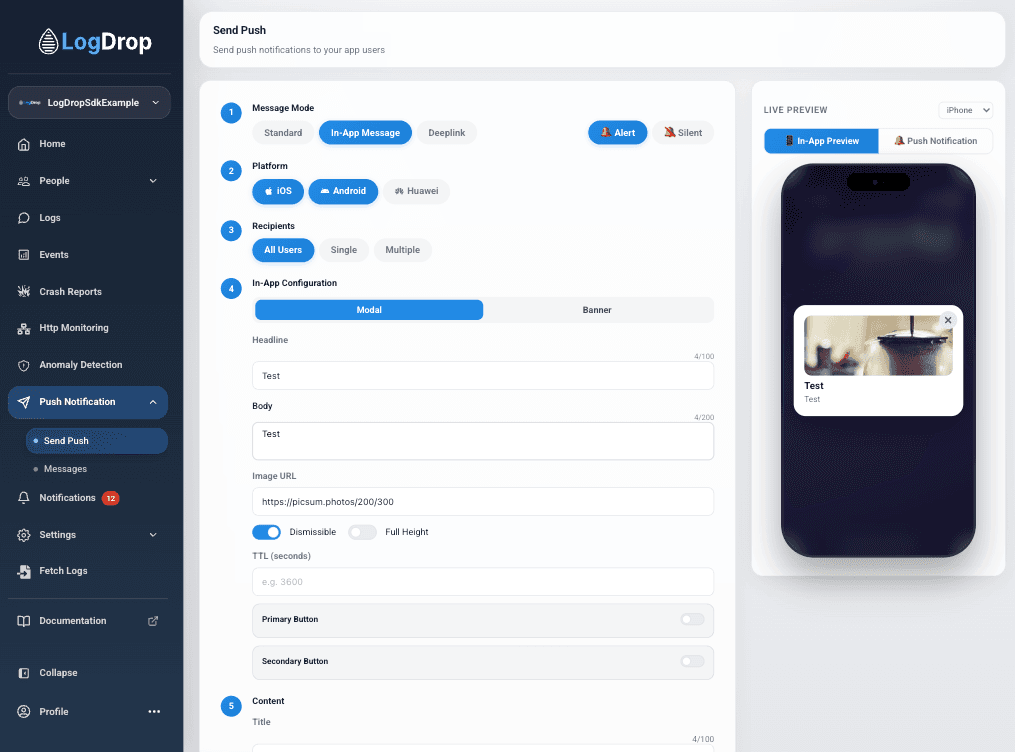
Message Mode: In-App Message
A rich, customizable visual overlay rendered inside the active app session.
- In-App Layout – Toggle between Modal (centered popup overlay) and Banner (top/bottom slide-in bar).
- Headline & Body – Main header text and descriptional text displayed inside the pop-up.
- Image URL – Path to a rich image to render inside the banner or modal.
- Toggles – Configure whether the overlay is
Dismissible(user can close it via a close button) orFull Height(takes up the entire screen). - TTL (seconds) – Time-to-Live; defines how long the in-app message is stored for display before expiring.
- Buttons – Enable and label
Primary ButtonandSecondary Buttonwith custom click actions.
Screenshot: In-App Message configuration
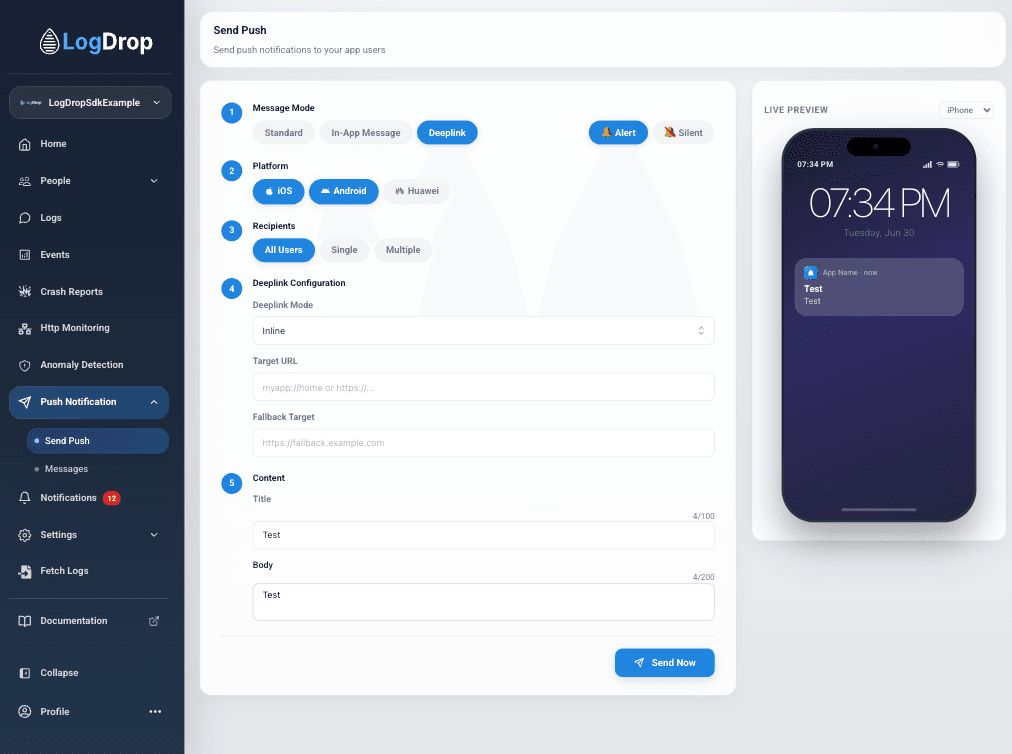
Message Mode: Deeplink
Directs users straight to a specific page or action in your application when clicked.
- Deeplink Mode – Select from predefined routes or enter a custom URI scheme.
- Target URL – The deep link URI (e.g.,
myapp://homeorhttps://...). - Fallback Target – A backup URL (such as a website or app store link) in case the app is not installed or the deep link fails to resolve.
Screenshot: Deeplink configuration
5) Live Preview & Sending
As you configure your message, the Live Preview panel on the right side of the screen dynamically renders a mockup of the notification (supporting iPhone and Android screen mockups).
Once verified, click Send Now to initiate the push request.